S.H.S
Race Team
Participating in the electrathon car race's since 2012!
'13 News
November 12, 2013
Class started to make prototypes for the new car out of cardboard then we will be making it out of wood to get an idea of what the car will look like and to see the sizing of it. Students are making mocks of the batteries, motor, etc.
2010 - present
2010 - present

On the board students are drawing a three dimensional life size replica of what we want the car to look like. They are including measurements of the frame, wheels, roll bar etc. We had discussions about what type of materials we are going to use for the frame and body. We are thinking about using aluminum for the frame. We are also talking about the weight of our new car. We would like for the weight of the car to be less than the weight of the car last year. The less weight, the faster our car would go over the course of an hour.

We don't want to use the heaviest materials but we need to find materials that will hold the weight of a 180 pound driver and can withstand any accidents that may occur. (Although there will be none). Which ever material is lighter, Polly carbon, or fiberglass, that's the one that we will use to coat our car in. So we were finishing up making the model of our car until we got interrupted by a phase two lock down and we never got to come back to the classroom because everyone got dismissed from school and we were not allowed to come back in.
We went into this lock down because a note was found in the boys bathroom saying there was going to be a bomb threat at 12:45 so everyone had to evacuate the building. So that was the end of that day.
November 14, 2013

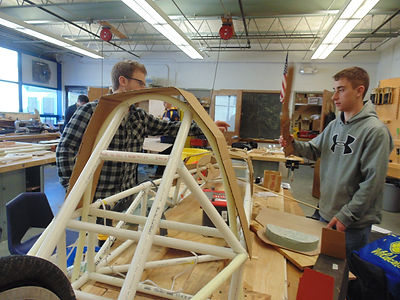
We started off class by continuing to finish our final design (life size sketch of the car on big brown paper). We are going to transfer the design into plywood so we can see if everyone will fit inside of it. We also have people working on our steering mock up. We starting to build the plywood model of the new car. We tapped the cut out to the wood. Now we are cutting the cut out out.

We were able to get the full size silhouette of the car cut out and propped it up to the desired ride height which is approximately 2" off the ground. Our motor mounts are being built at the same time as this out of wood that way we can see how everything will fit in real time and space.

November 18, 2013
We are using the beginning of our class time to take the plywood cut out that we made and make changes to the height of out car. Then we will be bring the cut out into the wood shop after lunch, and cut it to the new size that we want it at. Also we are going to discuss how long we want the car and what the width is going to be.
November 20, 2013

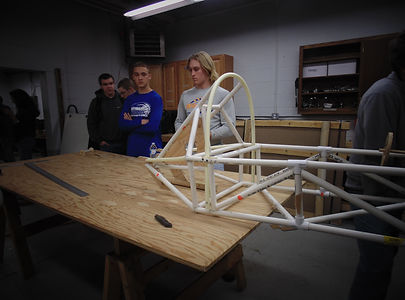
During this class time we are mocking up the body out of wood and the frame out of PVC piping so we can see what the actual size needs to be.

There are a few people working on the steering system that is being made out of wooden dowels.

We are building the PVC piping frame around one of our students so we can get an idea of what the height and width of the frame has to be. Once we decided the height and width we hot glued the pipes together and began to assemble the frame.

The frame is going to be 20inches wide and 6ft long out of 1 inch aluminum tube. The frame is going to be very simple and we will shape and fiberglass a aerodynamic cover for the frame.

This will allow our car to make the most of the energy.
November 24, 2013

This class we are continuing the mock up of the frame that's being built out of PVC piping. We had to adjust the length where the drivers feet are and we had to adjust the roll bar. We are also discussing bracing and frame support.

Now we are trying to figure out the steering system and the batteries and trying to see where we are going to put them inside of the frame. We had them in the front but now it looks like we are putting them in the rear under the driver seat.

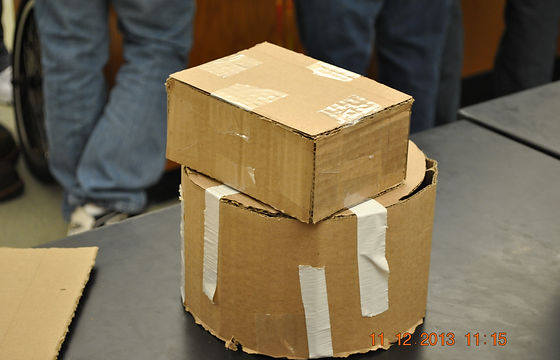
A few people are making the "ribs" out of cardboard so we can get an idea of how big the body has to be. They are going to be placed in a dome shape over the frame of the car. They are going to be cut in all different increments from smallest in the front (the nose shape), to largest in the back.

These will allow us to see how big the body will be once we make it out of foam and fiberglass. We also have been trying to develop the motor mounts and rear wheel dropouts out of wood.
December 2nd 2013

During the start of class we reviewed what each persons job was, that we needed to complete for the day so we could really focus when we were in the shop. Once in the shop students started to use mock up materials to see the sizing of our car. We continued with the PVC mock up of the frame.
December 4th 2013

The class did the top mock up of the body out of card board, they did the top portion where it curves in order to see how the driver will fit in the car. We also re-did our steering mock up to make it a lot cleaner and more precise. The car is coming together day by day.
Goal: We are hoping to be done with the mock up before Christmas break.
December 6th 2013

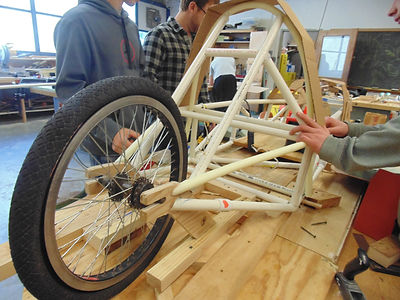
The actual car club modified the frame of the car yesterday after school. They made it so the tires would be placed back.We are redoing our motor mounts out of plywood and getting all of the tubing back into place. We also have redone the front wheel mounts using only tubing acting as control arms with no suspension. The steering knuckles are being built out of wood to make sure our steering will work. The plywood motor mount is being put into the frame so we can adjust its postion in relationship to the rear wheel and where it needs to be placed.urther so there would be enough weight on the front end to make steering more controllable and comfortable for the driver. Students are making a PVC mock up of the steering system and finishing up the back of the car along with steering and motor mount. We are almost done with the full mock up of the car.

We are redoing our motor mounts out of plywood and getting all of the tubing back into place. We also have redone the front wheel mounts using only tubing acting as control arms with no suspension. The steering knuckles are being built out of wood to make sure our steering will work. The plywood motor mount is being put into the frame so we can adjust its postion in relationship to the rear wheel and where it needs to be placed.
December 12th 2013
December 12 2013
During the class time the students were split up into two groups the frame
And the body groups. The people in charge of the frame have to make sure our mock up is measured correctly. any little detail of the car will have to be thought out when it comes to the placement of our components in the frame. The students in charge of our aerodynamic body are cutting apart foam used to insulate homes. We will be carving this to size and then making our fiberglass body shape based off of the mold they create. It is a long process but one that gives us experience to help future teams.
December 16th 2013
December 16 2013
Zach, Shawn, Andrew and Will Are starting to lay out the jig for the actual aluminum frame. They are measuring the PVC mock up and making a blue print of the measurements and then beginning to transfer the measurements onto ply wood. Brennan, Kellen and others are cutting foam for the mock up of the car. Our goal for the foam mock up is to get the correct dynamics for the nose and front of the car. Cody, Paul, and Jack are cutting the dowels for the wooden mock up of the steering system. They are making a wooden steering wheel and an axle.


December 18th 2013
December 18 2013
We started off the class by going to the car shop and continuing the tracing of the car frame onto ply wood. Jake, Will and Zach are measuring everything out to the exact measurements. Other students are still shaving down and cutting the foam for the mock up of the car. They are establishing the roll bar height from the body and then using those measurements they are cutting foam pieces so when it's all put together it will be an exact replica of the car but just in a foam version.